
Prerequisites
This post assumes you have completed this previous tutorial, where we'd created both a 3D terrain, and an animating starfield, and combined them into a single three.js experience. The source code where we left off looks like this.
Outcome
Now, we'll look at how we can get the terrain animating so that from the viewer's perspective, they are travelling along it from a first person perspective. The outcome can be seen by hovering the giph below:
There are multiple ways to animate a terrain, and for simplicity and speed, we'll do it in the exact same way we animated the stars in the starfield. This will get the effect up and running quickly as we're already familiar with the technique involved.
Another way to create this effect would be to move the floor based on the position of the camera - we'll do it that way in another tutorial.
Step 1: The animation concept
In this step, we're just going to understand the way in which we will animate the floor.
- Firstly, we'll quickly recap how the starfield was animated, so just skip that part if you remember.
- Secondly, we'll look at applying that same concept to animate the terrain.
Recap
If you look back to the stars code in one of the earlier tutorials, you'll see that we added a stars array at the start of the script, and then in the addSphere function we populated that array with spheres/stars. Then when it came to rendering the scene, we then animated the stars held in that array to make it look as though each one is moving forward. And once each star had a z-position greater than the camera position, we reset it's z-position so that it animated forward from the back again.
Applying the animation to the terrain
We're going to use this exact same concept from the recap above with the terrain. So where we added a stars[] array in for the starfield, we'll add a floor[] array for the ground. But instead of having lots of different terrain items like we had many spheres, we only need to hold 2 planes in the array.
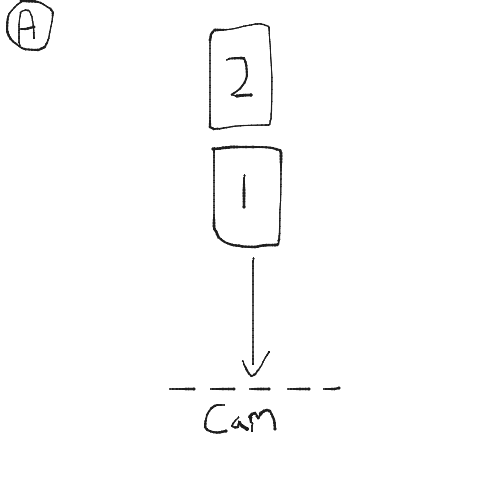
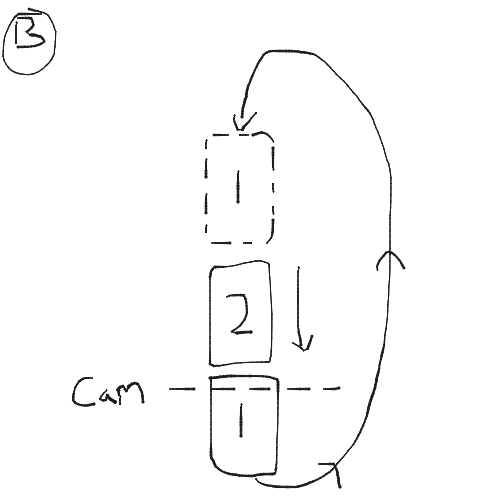
We only need two terrain items because what we're making will work like a treadmill conveyor belt. When the scene is loaded, we'll start off with two terrains on the scene, one with a z-positioning so that it is just behind the other. We then animate both terrains towards the camera as seen in image A below. Then when terrain 1 moves past the camera, we reposition it behind the second as showin in image B. We then keep animating both forward, and putting one behind the other to create the effect that we are moving along an infinite plane.
Step 2: Setting up the two terrains
Working from the code in the last tutorial, we need to add a floor[] array where our global variables are defined:
var camera, scene, renderer, stars=[], floor=[];
That's really simple, now we need to modify the addGround() function so that it looks like the next code snippet. This looks like a lot of code at first glance, but don't be alarmed as it's just a modification on what we've already got, and we'll step through what's going on next:
  function addGround(){

     for ( var z= -1600; z < 1600; z+=800 ) {

          //create the ground material using MeshLambert Material
          var groundMat = new THREE.MeshLambertMaterial( {color: 0xffffff, side: THREE.DoubleSide}  );

          //create the plane geometry
          var geometry = new THREE.PlaneGeometry(240,800,300,300);

          //make the terrain bumpy
          for (var i = 0, l = geometry.vertices.length; i < l; i++) {
            var vertex = geometry.vertices[i];
            var value = pn.noise(vertex.x / 10, vertex.y /10, 0);
            vertex.z = value *6;
          }

          //ensure light is computed correctly
          geometry.computeFaceNormals();
          geometry.computeVertexNormals();

          //create the ground form the geometry and material
          var ground = new THREE.Mesh(geometry,groundMat);
          //rotate 90 degrees around the xaxis so we can see the terrain
          ground.rotation.x = -Math.PI/-2;

          // Then set the z position to where it is in the loop (distance of camera)
          ground.position.z = z;
          ground.position.y -=4;

          //add the ground to the scene
          scene.add(ground);
          //finally push it to the stars array
          floor.push(ground);
        }

  }
Positioning one terrain behind the other
The first main change is the parameters passed to the PlaneGeometry constructor on line 9. The constructor arguments are as follows:
PlaneGeometry(width, height, widthSegments, heightSegments)
height — Height along the Y axis.
widthSegments — Optional. Default is 1.
heightSegments — Optional. Default is 1.
Most notably, we're now passing in a value of 800 for the height along the Y axis. And because of this, when looping through the two terrains, we need to position them at z-position intervals of 800. This is why the for loop in line 3 starts off at -1600, and loops to 1600, with an increment value of 800:
for ( var z= -1600; z < 1600; z+=800 )
The position is actually set in line 28:
ground.position.z = z;
By doing this, we ensure one terrain is always positioned behind the other. The only other notable change is that as well as adding the ground to the scene, we also add it to the floors array at the end (line 34):
floor.push(ground);
Step 3: Animating the terrains
When rendering the scene, we can animate the terrains with pretty much the same code that was used for the stars. In fact, we can do it within the same function. So to start with, we'll change the name of the animateStars() function to animateScene(), and also update the call to the function at the bottom of our script.
Then at the bottom of animateScene(), we'll add the following code:
  for(var i=0; i<floor.length; i++) {

      ground = floor[i];

      // move it forward by a 10th of its array position each time
      ground.position.z +=  0.5;

      // once the star is too close, reset its z position
      if(ground.position.z>400) ground.position.z-=1600;
    }
Since this is called in the render function, it's run 60 times every second. Therefore, we are constantly incrementing the position of both terrains (line 6) until they go beyond the camera, where we reset the position to -1600 (line 9).
Well Done
That's all there is to creating an infinite floor effect. We'll look at better ways to implement this in the future, but for now you should have the full effect. The entire source code is here on GitHub.